

Workflows run your business processes, ensure consistency and compliance, and stop your team from skipping crucial steps. But if you don’t have the right system and tools in place, generic workflows can create busywork without actually helping you complete your tasks.
This is where workflow optimization comes in. Optimization is about making the best of the resources available and building a process that helps you deliver the best results.
If you’re reading this, we’re going to assume you already know what workflows are and what they can do for your team. So, while there are lots of posts out there that define workflow optimization or list the benefits of workflow optimization at length, we’re going to get straight to the actionable tips you need.
In this post, we’ll:
- Identify the common errors in workflow design so you can avoid or eliminate them
- Take you through the best ways to optimize your existing workflows with a start-to-finish process you can apply today
- Introduce the intelligent workflow optimization features you can expect from our work management platform, Wrike
Wrike is the only tool you need to create, optimize, and automate even the most complex workflows. But first, let’s look at where your current workflows might be falling short.
5 workflow mistakes that hold teams back
The combination of your tasks and the workflow you use to deliver them will always be unique to your team. That said, some common hitches, bottlenecks, and communication gaps can be traced back to the way workflows are typically built and implemented.
It’s worryingly easy to create a workflow that looks great on paper but doesn’t achieve the clarity and efficiency you expect. So, let’s start by troubleshooting the potential flaws in your current plan.
1. Using generic workflows overlooks crucial steps
Workflow templates can seem like an efficient way to tackle repetitive tasks, but basic templates often fail to deliver consistent results across different business processes.
For example, while workflow stages like “Kickoff,” “Client Review,” and “Publish” are common in creative teams, this bare-bones process skips some of the essential work that goes into creating a complex design asset — like information gathering, creative brief approval, and internal feedback.
These missed steps mean generic workflows can create friction and bottlenecks further down the line. In contrast, a customized, optimized, streamlined workflow helps you move your tasks smoothly from ideation to delivery, knowing all the essential work has been completed before you move on to the next stage.
2. Manual data entry wastes time
When teams have to input similar data every time they kick off a workflow, it wastes time and increases the chance of human error. Data entry is rarely the type of work that people relish, and it can get in the way of value-adding tasks like strategic planning, idea generation, and creative work.
If you automate the manual tasks in your workflow — like sending updates, sharing briefs and guidelines, and setting deadlines — you free up time and reduce the potential for error. That’s why finding the opportunities for workflow automation is one of the most important tasks of successful workflow optimization.
3. Multiple tools get in the way of true task tracking
If your current workflows need teams to juggle the apps they use to message each other, discuss the work, track the tasks, and check their schedule, it’s highly unlikely your workflow is as efficient as it could be.
Switching between tools makes it harder to track tasks, resources, and assets, and leads to frustrating communication delays. That’s why many of the most streamlined business processes are built with workflow management software designed to do all this and more in one centralized workspace.
4. Information silos prevent collaboration
Picture this: Your design team is itching to get started on a new campaign, but they don’t have the budgeting and messaging information they need to build into their project plan. Or, later in the process, a designer works on a new version of an asset based on comments from the client, but they don’t share that feedback with the wider team. Instead of process improvement, the same mistakes happen again and again.
If your workflow system doesn’t include a way to share status updates and files, your team can’t collaborate on a deeper level. Completing daily tasks becomes harder and slower, and you have fewer opportunities to reflect together and refine your approach.
In contrast, robust file sharing and version control systems remove these silos from your workflow, fuelling a smoother and more collaborative process.
5. Poor adoption makes alignment impossible
If only a few of your team members engage with your workflow, it won’t achieve its full potential. You’ll still face a lack of accountability, and it’ll be harder to build momentum behind the work when your team isn’t communicating as efficiently as it could.
This is why the interface and the onboarding process are essential parts of any optimization strategy. If the software doesn’t make work easier and your team isn’t clear on how to use it, it won’t improve your existing workflows.
The good news is that all these inefficiencies can be overcome with thorough workflow analysis and the right tools.
In the next section of this post, we’ll cover the workflow optimization process in more detail.
How to optimize your workflow: Your step-by-step guide
Like your workflow itself, the workflow optimization process is often linear. Let’s break down the steps from start to finish.
1. Map your current processes
Optimizing workflows starts with analyzing and evaluating the approach you already have in place. At the start of the process, you might want to create a document or workflow diagram to help you get a handle on the situation. These documents can include information like:
- The distinct beginning, middle, and end phases of the workflow (which you might know as the input, process, and output). For example, a software development team could receive a bug report (the input), work on a fix and test it (the process), and then release it (the output).
- All good workflows should include an evaluation stage to help you share what you’ve learned and improve your system, but don’t worry if your old workflow doesn’t have one — optimization is about bridging these gaps.
- The subtasks involved in each stage of the workflow. For example, the “Kickoff” phase might contain subtasks to check you have the information and resources you need before a task is officially delegated. Some teams might need to have a meeting at this stage or prepare a formal brief, whereas others will be comfortable starting without one.
- The points where key decisions are made. Decision points are moments in the lifecycle where a choice could change the outcome of the task or project. For example, after a milestone, you could decide to continue with the system you’ve used so far or adjust your approach based on changes to the original brief. For some complex workflows, it pays to highlight these crucial moments in your process diagram.
- The stakeholders involved with each process. Your diagram should also list each team member’s roles, responsibilities, skills, and the resources they need to be able to access to complete their work to a high standard.
You can then use the information you’ve noted to visualize your workflow. This can help you understand how the stages and stakeholders relate to each other, so it’s easier to identify the gaps and bottlenecks that could be solved with workflow optimization strategies later.
There are plenty of ways to visualize a workflow. For example:
- Sequential workflow diagrams like Waterfall charts and flowcharts suit a workflow where the outcomes are decided at the beginning, and the steps to get there have to be completed in a fixed order.
- Gantt charts give you an overview of dependent tasks and help you identify the critical path your team needs to take to reach their goals.
- Production calendars can highlight crucial deadlines and help you understand whether your workflow can reasonably be completed in the time you have available.

When you have a complete visual representation of the current situation, you’ll be in a great position to make informed decisions about the next stage of the optimization process.
2. Identify areas for improvement
To find the areas where your current workflow falls short, look at the analysis documents you created earlier, listen to feedback from your team, and consider other indicators like customer satisfaction surveys.
In particular, you want to identify:
- Bottlenecks in the workflow, where tasks tend to stop progressing, pile up, and cause delays. Bottlenecks are common during project intake and also testing and approval. This is often because a team doesn’t have the capacity to deal with the volume of requests or the complexity of the work.
- Unnecessary steps which could be removed or combined. For example, once your team of writers is comfortable with the brand guidelines, you might be able to remove redundancies by combining an internal review and a compliance review, reducing feedback rounds and speeding up the workflow.
- Manual tasks that could be automated. The solution here could be as simple as creating a template task card for your Kanban board so you can start tracking repeatable tasks more quickly. Or, if you’re still going through a manual process like writing invoices, consider software that could generate them automatically.
- Areas of friction. Your customer relationships should also play a role in your decision making when you’re optimizing a workflow. If your tasks frequently move backwards in your workflow from “In Review” to “Changes Requested,” for example, it’s usually a sign that expectations need to be clarified, that you’re missing information at an earlier stage, or that you need to devote more resources to a certain process.

When you’ve found opportunities to improve your process, you can prioritize them, set goals, create new strategies, and communicate the changes to your team.
3. Choose your performance metrics
It’s common to run into problems with your workflow if you don’t have a way of measuring your success. But you’ll also struggle with workflow optimization if you start collecting data for data’s sake.
The KPIs or OKRs that work for one company may not work for another, so it’s important to choose a progress measurement that tracks your goals and gives you information you can use to measure your business growth accurately.
For example:
- If your goal is to increase awareness of your brand, measuring the number of impressions your website gets is a way of understanding how successful your marketing efforts have been. If the traffic to your site increases, it’s a sign your content is reaching more people.
- If you want to improve customer satisfaction, measuring your error rate (alongside other tools like surveys) can be a good step to include. If the error rate decreases, it can show you’ve improved your process and you’re offering a more reliable user experience.
- If you want to increase efficiency, productivity, or profitability, you can track the time spent on each task. If the average time drops, it’s a sign you’ve put the right tools in place to support your team and they’re now able to do more with the resources available.

When you focus on the data that really matters, you can tell how successful your optimization has been.
4. Get your team on board
Optimizing a workflow can increase employee satisfaction and create greater transparency by showing how everyone’s tasks contribute to the bigger picture. But to do this, it’s essential to train your team. This is the vital step that ensures the new workflow process you’ve optimized on paper will actually support the people who need to use it.
Note: If you’ve used project management or workflow optimization software (like Wrike) during this process of reflection and improvement, consider establishing an onboarding workflow to help engage your team with the process, provide training on how to use any new software tools, or welcome new employees to the team for a new project.

5. Monitor and refine your workflow
A fixed workflow is valuable not just because it saves time, but also because it gives you more data on your team’s performance and results every time it’s repeated.
Like other management tasks, such as strategic planning, resource allocation, and stakeholder management, workflow optimization is rarely a one-off event.
As your team, tools, and objectives change, it’s highly likely you’ll identify more process deficiencies and, correspondingly, more opportunities for business process improvement.
So, once your workflow is established, create a documentation process that continues to:
- Monitor your KPIs
- Create regular reports
- Collect customer feedback
- Ask for the opinions of your team

When you can report on these key indicators, you can continually streamline processes and you’ll be in a stronger position to respond to changes and challenges as you meet them.
To sum up, the best approach to workflow optimization is to spend time understanding where you are, establish where you want to go, and invest your resources in the systems that will help you take your whole team there in the most efficient way.
While it is possible to go through these steps and optimize your workflow without dedicated work management software, project management tools like Wrike make it far easier to achieve your goals by:
- Sharing your overviews to create transparency for your team and show them how their individual tasks contribute to the project
- Tracking your workflows to monitor performance and identify further areas for improvement
- Customizing new workflows to meet the needs of your team
Global brands like Siemens Smart Infrastructure, Electrolux, and Nickelodeon use Wrike as their go-to workflow automation software.
Now, let’s see how your team can apply the workflow optimization techniques we discussed above with the tools included with Wrike.
Optimize your workflows the easy way, with Wrike
Wrike is a work management platform with industry-leading features to create, track, automate, and optimize your workflows.
Tailor-make your workflow visualizations
Wrike’s intuitive project dashboards give you instant insights chosen to support your team, from whole-project overviews for teams that collaborate across departments to private dashboards where individuals can view their notifications and prioritize their work.
Wrike’s dashboards put your workflow data to work and help you visualize your tasks in a way that empowers your team. This is the adaptability you need to encourage collaborative work and keep everyone on the same page.
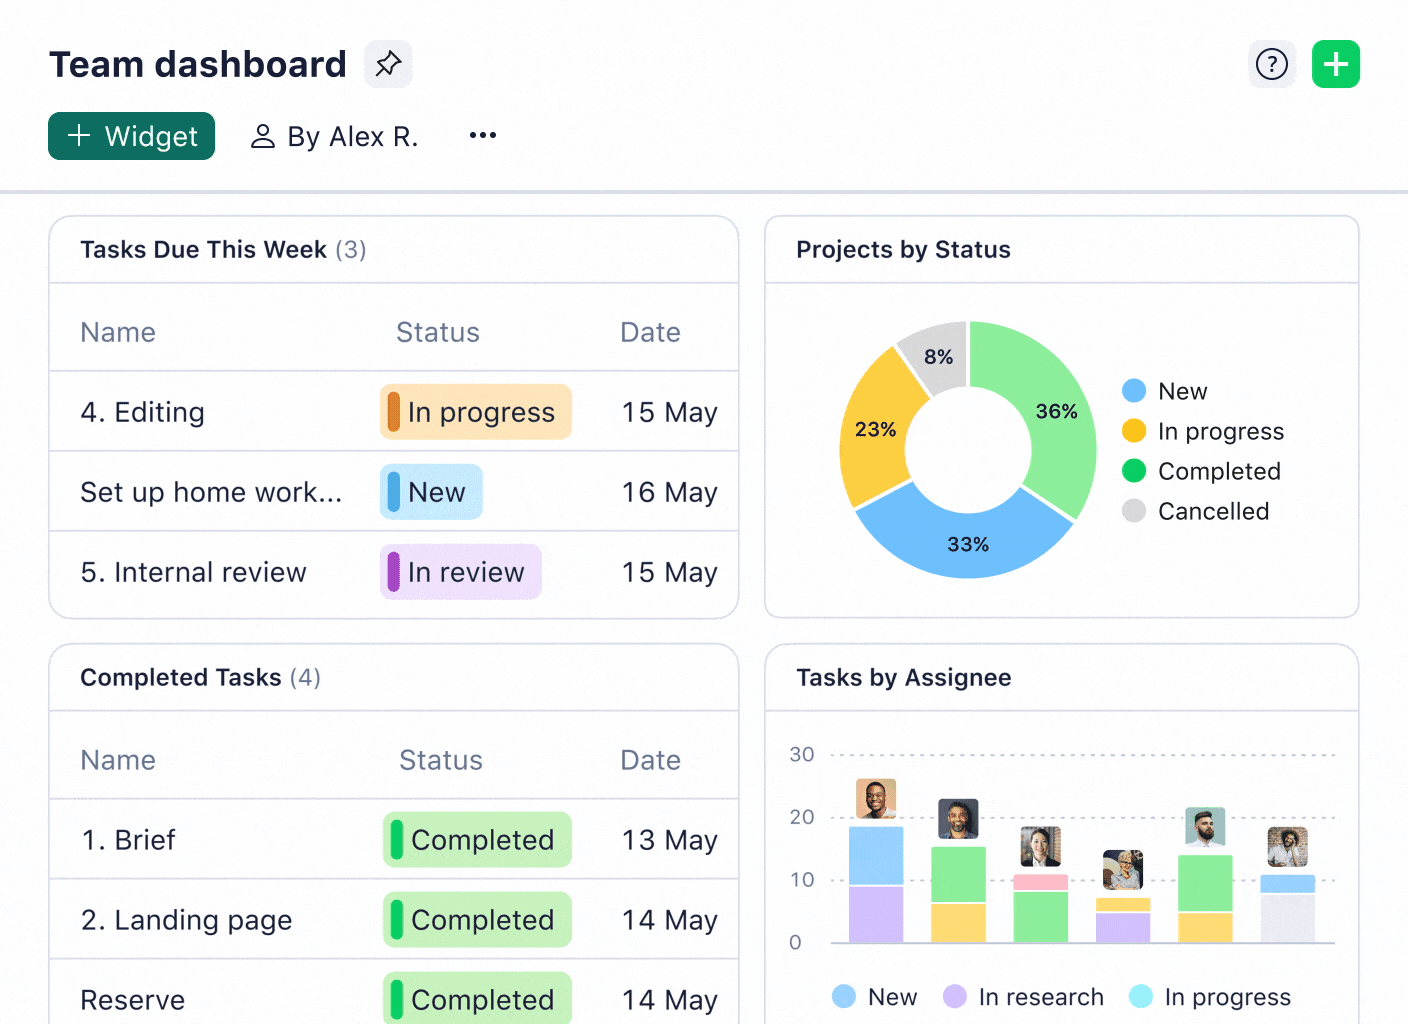
Plus, with our powerful task management and cross-tagging systems, you know you’re always viewing real-time data across your boards.
Get started fast with predefined template dashboards, or build out your team’s workspace from scratch with widgets and views carefully selected to help you meet your objectives.
Automate your workflow with groundbreaking Work Intelligence®
Wrike’s automation does the heavy lifting for all the manual tasks in your workflow. For example, Work Intelligence reduces your team’s mundane tasks by generating content, editing and adapting your existing work, and transforming your project notes into actionable items for your team.
Wrike also offers smart risk prediction reports based on dozens of criteria, like your team’s capacity, past performance, and the complexity of the workflow.
And, if you’re still struggling with workflow mapping and identifying the weak points in your process, you can use Wrike’s AI automation suggestions to suggest automation rules tailored to you and your team.

Bridge communication gaps to boost collaboration
Wrike comes with hundreds of productivity boosters in the form of when/then automation rules. These eliminate countless hours teams would otherwise spend updating Excel spreadsheets, writing notification emails, or keeping managers in the loop with individual progress reports.
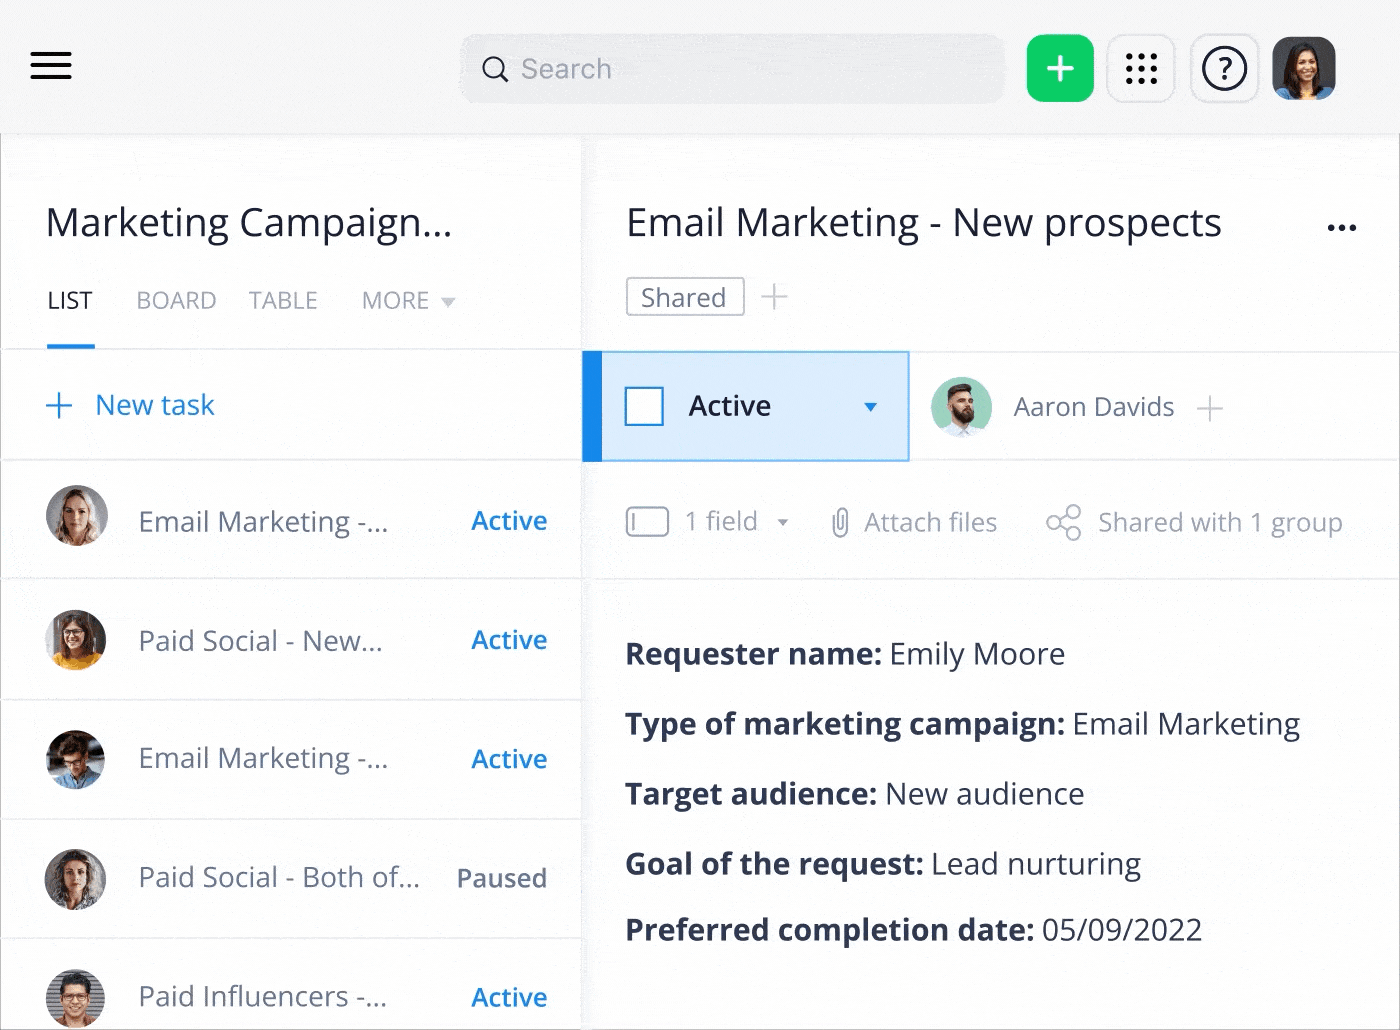
For example, while project intake can be a drawn-out process, Wrike’s request forms gather information on the tasks, add the necessary files, and even set up a new task with a custom workflow. Instead of sitting in a meeting, and then going back to their desks to wait for the vital resources they need, your team can start a project automatically with all the information they need.
Along with automated notifications and dynamic task tracking, features like request forms optimize your workflow by putting the information where it needs to be and keeping the right team members updated at every stage of the process.
Centralize proofing and approval to increase efficiency
Another common area where teams can optimize their workflows is during the final proofing stages. Whether it’s a redundant step that could be removed, or a limited number of approvers who need more support, it’s not uncommon for workflows to stall just before the finish line.
With proofing and requests directly on the asset, tagged requests, and instant notifications, Wrike saves time, energy, and confusion at the point when you most need your workflow to run smoothly. With shared folders, you know you’re always looking at the latest version of the asset.
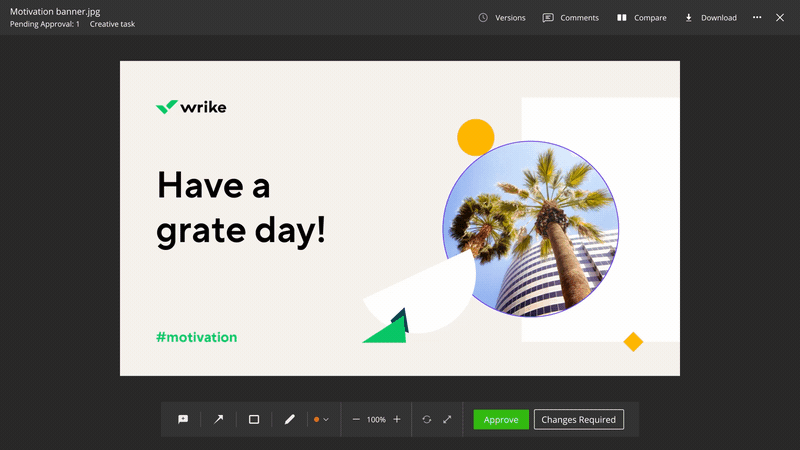
And, with over 400 integrations — including Adobe Creative Cloud — you can make changes and update your team without ever leaving Wrike.
Generate reports with the essential information you need
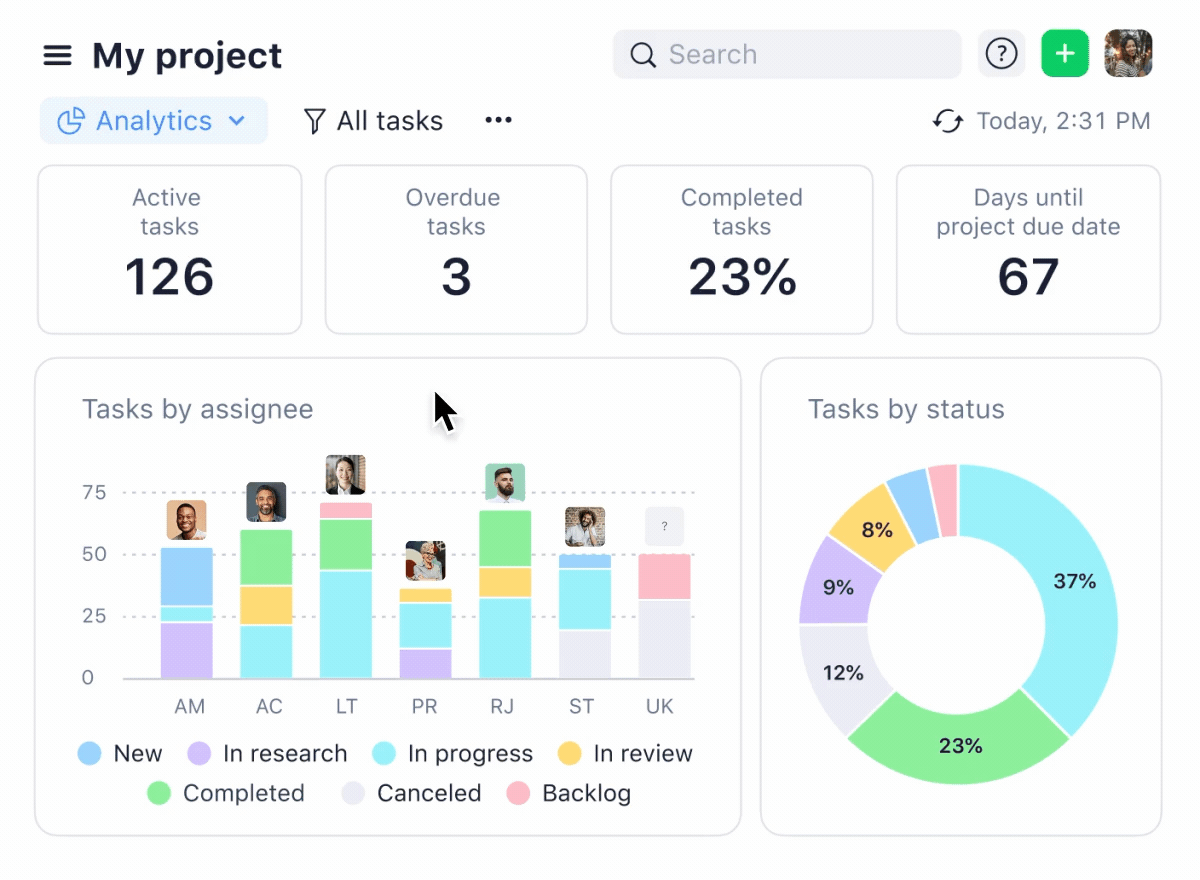
As we said above, the most efficient workflows are continually monitored and optimized so they can better serve the teams that use them. With Wrike, you can filter your workflow data and drill down to see exactly how well the system is working.
This granular data can help you understand why you’ve run into a problem — for example, by letting you view your team’s capacity and see the time they’ve tracked on a certain task. It can show you the work that’s gone into an asset so far, with a record of comments and status changes for the task. It can even show you the headline risks to your project success, flagging a task as medium risk before it hits the red.
With Wrike, you have continual access to the information you need to inform your decision making and lead your team. You can also set up your workspace to generate regular progress reports, so you can keep up to date with the facts you want to see and share snapshots with other stakeholders.
Wrike: Next-level workflow optimization for everyone
Wrike gives you the bird’s-eye view and in-depth data you need to optimize your workflows effectively. Then, when you put your systems into practice, you have the latest workflow tracking and automation tools at your fingertips, so you can continually refine the system you put in place for your team.
Put simply, Wrike’s workflow software:
- Sets you up with workflows customized and optimized to your team’s exacting requirements
- Automates your manual tasks to save time and increase your productivity
- Centralizes your workflows and your communications so you never miss a beat
- Shares your files with everyone in your team, wiping out the information silos that are otherwise time-consuming to break down
- Creates a workspace your team wants to engage with and collaborate in, so you can create even more efficient workflows in the future
To find out how Wrike can help optimize your existing workflows and establish new ones, contact our customer service team and book your demo today.
